> ## Documentation Index
> Fetch the complete documentation index at: https://docs.cubic.dev/llms.txt
> Use this file to discover all available pages before exploring further.
# Local CLI review
> Run a fast local cubic AI code review from the command line before you push.
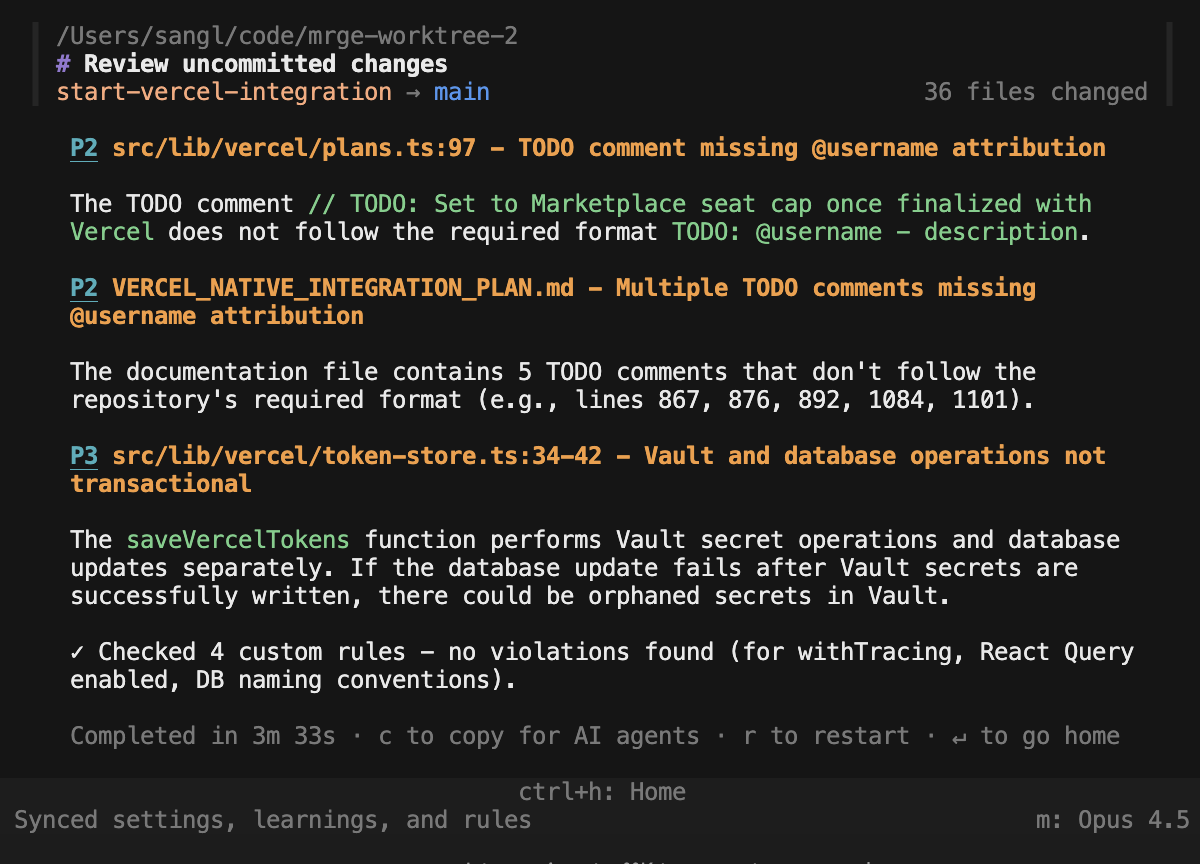
The **cubic CLI** runs a lightweight version of cubic's AI code review directly into your terminal. It's designed as a fast pre-flight check before you push, not a replacement for cubic's cloud PR review.
The CLI detects bugs in your local changes and generates a prompt for you to paste into your AI IDE (like Cursor) to automatically fix them. It syncs with supported cubic cloud context such as your [custom agents](/ai-review/custom-agents), past feedback, and repository settings, but it does **not** use the same models or review pipeline as cubic's cloud PR review.
Do not expect identical results between `cubic review` and cubic's cloud PR reviews. The CLI is
intentionally faster and less thorough for local iteration, while cloud PR reviews are more thorough
and may find issues that the CLI did not flag.
CLI usage shows up in your [analytics dashboard](https://www.cubic.dev/analytics) as **CLI sessions** so you can track adoption across your team.
## Getting started
Install the cubic CLI with the command for your operating system.
### macOS and Linux
Use the shell installer:
```bash theme={null}
curl -fsSL https://cubic.dev/install | bash
```
### Windows
Use `npx`:
```powershell theme={null}
npx @cubic-dev-ai/cli install -g
```
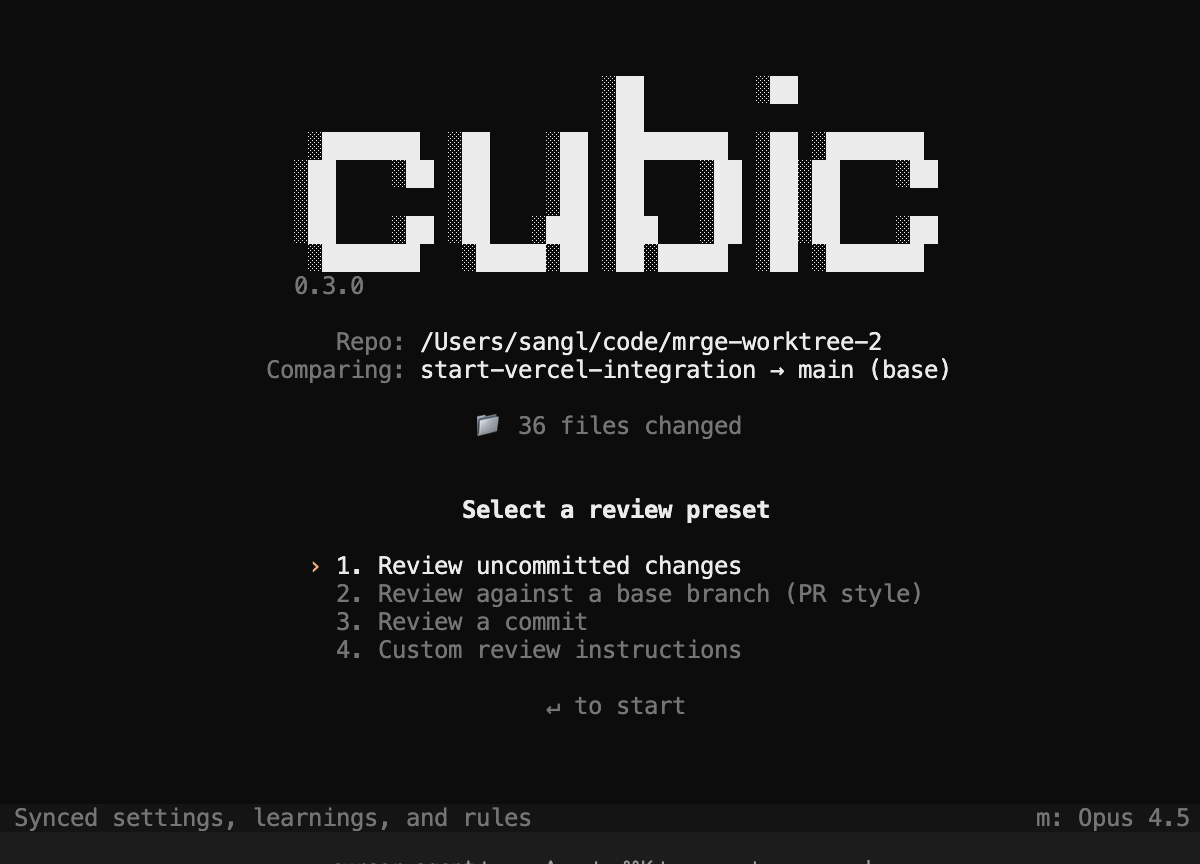
After installation, type `cubic` to open the CLI and start a review.
 ## Authentication
The first time you run `cubic`, it will automatically open your browser to sign in with your cubic.dev account. Once authenticated, you're all set — no extra steps needed.
If you run into any authentication issues, press `Ctrl+L` to log out and re-authenticate.
## Bring your coding subscription
The CLI includes a default model, but you can also connect your **ChatGPT Plus/Pro** or **Claude Code** account to run reviews with additional models. These integrations are optional.
### Use your ChatGPT subscription
Connect your ChatGPT account to run reviews against Codex models with your existing plan:
```bash theme={null}
cubic auth connect codex
```
Sign-in happens in your browser. Once connected, choose the Codex model that fits the task.
### Use your Claude Code account
Connect your Claude Code account to run reviews with Claude:
```bash theme={null}
cubic auth connect claude-code
```
Choose the Claude model that fits the review: `opus` when thoroughness matters most, `sonnet` for everyday reviews, `haiku` when you need speed.
#### Why this is permitted under Anthropic's policy
cubic runs your local Claude Code as a subprocess and talks to it over the [Agent Client Protocol (ACP)](https://github.com/agentclientprotocol/agent-client-protocol), the same pattern [Zed](https://zed.dev/docs/ai/external-agents#claude-agent) uses for its Claude Agent. Your Claude Code installation authenticates with Anthropic, makes every model call, and bills you directly. cubic never sees, stores, or proxies your credentials, and does not call Claude's API, use the Agent SDK, or offer Claude.ai login.
Reviews are interactive: you start each session and drive it from the UI. cubic does not run autonomous loops in the background. This is the "ordinary use of Claude Code" that Anthropic's [usage policy](https://code.claude.com/docs/en/legal-and-compliance) permits for Pro/Max subscribers.
### Switch providers any time
Press `Ctrl+P` to switch provider or `m` to switch model. If you have more than one provider connected, cubic picks the best available model by default. You can change either at any time — no re-authentication needed.
To disconnect a provider, run `cubic auth logout` and pick the one you want to remove. Disconnecting Claude Code only detaches it from cubic; your Claude Code login stays intact.
## When to use local review
Use one of these two workflows:
* **Default: GitHub review only**: Push your branch, let cubic review the PR on GitHub, then fix the comments. This is the simplest setup and the best default for most teams.
* **Advanced: local review plus GitHub review**: Run local review before you push so you can iterate on your code before opening a PR, then rely on GitHub review as the final pass.
## Use it with your coding agent
Most teams use the cubic CLI together with a coding agent:
* Ask your coding agent to `"review my code"` while you are working.
* Run `cubic review` when you want an explicit local pass in the terminal.
* Re-run the local review after fixes, then push and rely on the GitHub PR review as the final pass.
If you have not connected cubic to your editor yet, start with
[Connect cubic to your IDE](/ide/agent-setup).
## Add this to `AGENTS.md`, `CLAUDE.md`, or `.cursorrules`
Use this snippet if you want your coding agent to follow the default GitHub-first workflow:
```markdown theme={null}
## cubic workflow
After pushing, wait for cubic's GitHub review.
Ask the agent to "check cubic comments" or "fix cubic issues".
Push the fixes and repeat until the pull request is clean.
```
Add this extra block if you want the advanced local-review loop:
```markdown theme={null}
Before committing, run `cubic review` or ask the agent to "review my code".
Fix the validated issues and run the local review again.
Repeat until the local review is clean or only disputed issues remain.
Do not expect the cubic CLI and GitHub PR review to return identical results.
The CLI is faster and less thorough.
```
## Common Workflows
The CLI adapts to different stages of your development process.
## Authentication
The first time you run `cubic`, it will automatically open your browser to sign in with your cubic.dev account. Once authenticated, you're all set — no extra steps needed.
If you run into any authentication issues, press `Ctrl+L` to log out and re-authenticate.
## Bring your coding subscription
The CLI includes a default model, but you can also connect your **ChatGPT Plus/Pro** or **Claude Code** account to run reviews with additional models. These integrations are optional.
### Use your ChatGPT subscription
Connect your ChatGPT account to run reviews against Codex models with your existing plan:
```bash theme={null}
cubic auth connect codex
```
Sign-in happens in your browser. Once connected, choose the Codex model that fits the task.
### Use your Claude Code account
Connect your Claude Code account to run reviews with Claude:
```bash theme={null}
cubic auth connect claude-code
```
Choose the Claude model that fits the review: `opus` when thoroughness matters most, `sonnet` for everyday reviews, `haiku` when you need speed.
#### Why this is permitted under Anthropic's policy
cubic runs your local Claude Code as a subprocess and talks to it over the [Agent Client Protocol (ACP)](https://github.com/agentclientprotocol/agent-client-protocol), the same pattern [Zed](https://zed.dev/docs/ai/external-agents#claude-agent) uses for its Claude Agent. Your Claude Code installation authenticates with Anthropic, makes every model call, and bills you directly. cubic never sees, stores, or proxies your credentials, and does not call Claude's API, use the Agent SDK, or offer Claude.ai login.
Reviews are interactive: you start each session and drive it from the UI. cubic does not run autonomous loops in the background. This is the "ordinary use of Claude Code" that Anthropic's [usage policy](https://code.claude.com/docs/en/legal-and-compliance) permits for Pro/Max subscribers.
### Switch providers any time
Press `Ctrl+P` to switch provider or `m` to switch model. If you have more than one provider connected, cubic picks the best available model by default. You can change either at any time — no re-authentication needed.
To disconnect a provider, run `cubic auth logout` and pick the one you want to remove. Disconnecting Claude Code only detaches it from cubic; your Claude Code login stays intact.
## When to use local review
Use one of these two workflows:
* **Default: GitHub review only**: Push your branch, let cubic review the PR on GitHub, then fix the comments. This is the simplest setup and the best default for most teams.
* **Advanced: local review plus GitHub review**: Run local review before you push so you can iterate on your code before opening a PR, then rely on GitHub review as the final pass.
## Use it with your coding agent
Most teams use the cubic CLI together with a coding agent:
* Ask your coding agent to `"review my code"` while you are working.
* Run `cubic review` when you want an explicit local pass in the terminal.
* Re-run the local review after fixes, then push and rely on the GitHub PR review as the final pass.
If you have not connected cubic to your editor yet, start with
[Connect cubic to your IDE](/ide/agent-setup).
## Add this to `AGENTS.md`, `CLAUDE.md`, or `.cursorrules`
Use this snippet if you want your coding agent to follow the default GitHub-first workflow:
```markdown theme={null}
## cubic workflow
After pushing, wait for cubic's GitHub review.
Ask the agent to "check cubic comments" or "fix cubic issues".
Push the fixes and repeat until the pull request is clean.
```
Add this extra block if you want the advanced local-review loop:
```markdown theme={null}
Before committing, run `cubic review` or ask the agent to "review my code".
Fix the validated issues and run the local review again.
Repeat until the local review is clean or only disputed issues remain.
Do not expect the cubic CLI and GitHub PR review to return identical results.
The CLI is faster and less thorough.
```
## Common Workflows
The CLI adapts to different stages of your development process.
 ### 1. Review Uncommitted Changes (Default)
Review code you are currently working on, before you commit.
```bash theme={null}
cubic review
```
### 2. Review a Pull Request (Branch Review)
Compare your current branch against a base branch (e.g., `main`) to catch issues before opening a PR.
```bash theme={null}
# Auto-detect base branch
cubic review --base
# Explicit base branch
cubic review --base main
```
### 3. Review a Specific Commit
Analyze changes introduced by a specific commit hash or reference.
```bash theme={null}
cubic review --commit HEAD~1
```
### 4. Custom Instructions
Focus the review on specific concerns like security or performance.
```bash theme={null}
cubic review --prompt "check for XSS vulnerabilities"
```
## Command Reference
The primary command is `cubic review`.
```bash theme={null}
cubic review [options]
```
### Options
| Option | Alias | Description |
| -------------------------- | ----- | --------------------------------------------------------------------------------- |
| `--json` | `-j` | Output results as JSON (for CI/automation) |
| `--output-format ` | | Select `text`, `json`, or streaming `stream-json` output |
| `--base [branch]` | `-b` | Review against a base branch (PR-style). Auto-detects base if no branch specified |
| `--commit
### 1. Review Uncommitted Changes (Default)
Review code you are currently working on, before you commit.
```bash theme={null}
cubic review
```
### 2. Review a Pull Request (Branch Review)
Compare your current branch against a base branch (e.g., `main`) to catch issues before opening a PR.
```bash theme={null}
# Auto-detect base branch
cubic review --base
# Explicit base branch
cubic review --base main
```
### 3. Review a Specific Commit
Analyze changes introduced by a specific commit hash or reference.
```bash theme={null}
cubic review --commit HEAD~1
```
### 4. Custom Instructions
Focus the review on specific concerns like security or performance.
```bash theme={null}
cubic review --prompt "check for XSS vulnerabilities"
```
## Command Reference
The primary command is `cubic review`.
```bash theme={null}
cubic review [options]
```
### Options
| Option | Alias | Description |
| -------------------------- | ----- | --------------------------------------------------------------------------------- |
| `--json` | `-j` | Output results as JSON (for CI/automation) |
| `--output-format ` | | Select `text`, `json`, or streaming `stream-json` output |
| `--base [branch]` | `-b` | Review against a base branch (PR-style). Auto-detects base if no branch specified |
| `--commit [` | `-c` | Review a specific commit |
| `--prompt ` | `-p` | Custom review instructions |
**Note:** `--base`, `--commit`, and `--prompt` are mutually exclusive.
## Output Formats
### Text Output (Default)
Human-readable output with colored priority labels, designed for interactive use.
```text theme={null}
[P0] src/api/auth.ts:45
SQL injection vulnerability in user lookup
User input is concatenated directly into SQL query without parameterization.
```
### JSON Output
Structured output for tools and automation.
```bash theme={null}
cubic review --json
```
```json theme={null}
{
"issues": [
{
"priority": "P0",
"file": "src/api/auth.ts",
"line": 45,
"title": "SQL injection vulnerability in user lookup",
"description": "User input is concatenated directly into SQL query without parameterization."
}
]
}
```
### Streaming JSON Output
Use streaming JSON when an agent, CI job, or other integration needs review progress before the
review finishes.
```bash theme={null}
cubic review --output-format stream-json
```
The command writes compact NDJSON events to stdout as the review runs, including finding updates,
retries, heartbeats, and one final `review.completed` or `review.failed` event. Use `--json` instead
when you only need one JSON object after the review completes.
## Auto-update
The cubic CLI updates itself automatically. Each time you run a command, it checks in the background for a newer version. If one is available, it upgrades the install in place and then runs that command on the updated binary.
### Disabling auto-installs
Add to your global cubic config (`~/.config/cubic/config.json`):
```json theme={null}
{
"disable_auto_updates": true
}
```
With this set, cubic still tells you when a new version is available but does not install it:
```text theme={null}
New version available: v1.2.2. Run `cubic upgrade` to install.
```
### Skipping the check entirely
Set the environment variable to opt out of both the version check and any install:
```bash theme={null}
export CUBIC_DISABLE_AUTOUPDATE=1
```
This is useful in CI, on machines without outbound internet, or when you want to pin a specific version.
### Upgrading manually
Run `cubic upgrade` to upgrade immediately to the latest release, or `cubic upgrade ` to install a specific version.
## AI attribution tracking
The cubic CLI installs [git-ai](https://usegitai.com) during setup to tag AI-assisted commits with git notes. These notes power the [AI coding analytics](/analytics/ai-coding) dashboard for tool usage and authorship trends.
Attribution tracking is **enabled by default**. git-ai shows a brief AI vs human authorship summary after each commit.
### Opting out at install time
Set `CUBIC_DISABLE_GIT_AI` before running the installer to skip git-ai during setup.
macOS and Linux:
```bash theme={null}
CUBIC_DISABLE_GIT_AI=true curl -fsSL https://cubic.dev/install | bash
```
Windows:
```powershell theme={null}
$env:CUBIC_DISABLE_GIT_AI = "true"
npx @cubic-dev-ai/cli install -g
```
Windows Command Prompt:
```cmd theme={null}
set CUBIC_DISABLE_GIT_AI=true
npx @cubic-dev-ai/cli install -g
```
### Managing tracking after installation
Use `cubic stats` to enable, disable, or check the status of AI attribution tracking at any time:
```bash theme={null}
# Check current status
cubic stats status
# Disable tracking
cubic stats disable
# Re-enable tracking
cubic stats enable
```
`cubic stats disable` removes git-ai hooks and persists your preference so future upgrades will not re-enable it. `cubic stats enable` re-installs git-ai and clears the opt-out flag.
## Limitations
Usage is unlimited while the CLI is in alpha, subject to rate limits to ensure fair access for all users.
Because the CLI is optimized for speed and local iteration, it is less thorough than cubic's cloud PR reviews. If you need the most complete review, open or update a PR and rely on the cloud review as the source of truth.
]